Saturday, March 7, 2015

Spring has sprung !!

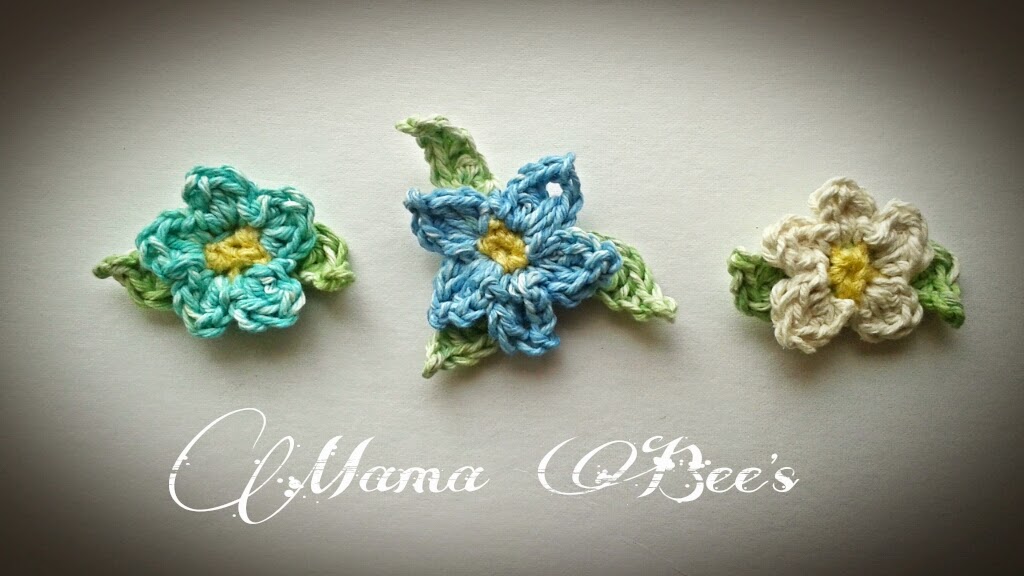
Recently, in one of my awesome swap group we were assigned an Easter basket swap.  Come to find out my partner is an older woman and I do believe that the basic Easter Bunny basket will not work. On that note, I have been scouring the internet for basic flower apliques and have found nothing that I like .  I have come up with these two cute basic flowers. The first flower is a rounded flower with two leaves. The second flower is a slightly larger pointed flower with three leaves. The flowers and the leaves are both worked separately and later sewn together. The items you will need for this project are:

Cotton yarn in yellow, blue and white. You can also use any worsted weight yarn.
G hook
Needle for sewing
**picot: ch2, slip stitch in first ch. **

Small flower

Using yellow Ch2
R1: 5 sc in first ch. Join in first sc. Fasten off weave ends. (5sc)
R2: Using blue, join with slip stitch at any sc, * ch1, hdc,DC,hdc,ch1, slip stitch in same sc, slip stitch in next sc*, repeat around in each sc. Join in joining ch. Fasten off leaving long tail for weaving.

Small leaves

Using green ch2
R1: 4sc in first ch, join in first sc.
R2: *ch5, slip stitch in first ch, sc in next, 2dc in next, hdc in next, sc in next, slip stitch in next, repeat * to* in each sc around. Join in join ch. Fasten off leaving long tail for sewing.

Large flower

Using yellow, repeat R1 of small flower
R2: *ch1, hdc,DC, picot,DC,hdc,ch1,slip stitch in same sc, slip stitch to next sc*. Repeat from * to * in each sc around. Join in joining ch. Fasten off leaving long tail for sewing.

Large leaves

Using green ch2, 5sc in first ch from hook, join in first sc.
R2: *ch7, slip stitch in first ch from hook, sc in next, hdc in next, 2 DC in next, hdc in next , sc in next, slip stitch in next 2 sc* repeat twice more for a total of 3 leaves. Fasten off leaving long tail for sewing.

Place flower directly on top of center of leaves and using tail from flower sew onto leaves. Using tail from leaves sew flower onto anything you'd like!

I hope you enjoy these patterns and share your projects on my Facebook page Mama Bee's Crafty Things and visit my Ravelry shop for more of my patterns.
***As always PLEASE DO NOT sell my patterns. You MAY sell items made from these patterns but please share a link to my page 💗💗💗

Sunday, August 3, 2014

Pretty Little Sunflower

After a LOOOOOOOONG break I have finally started designing patterns again.Yay!
This pattern was particularly designed for a crochet swap group I am part of. Our swap was Kitchen themed and my swap partner for the month has hers decorated in Sunflowers. I couldn't find a Sunflower applique that I enjoyed so I decided to design one. I enjoyed it so much that I thought I would share with y'all !

Stitches used
Sc= single crochet
Dc= double crochet
picot= ch3,sc in2nd ch from hook

Materials
Worsted weight yarn in dark brown and mustard/gold
H hook

with Brown

R1: ch4, 5 Dc in 3rd chain from hook, join in top of ch4 (6)
R2: ch3, dc in same chain as join, 2dc in each around, fasten off and weave ends(12)

With Mustard/gold

Join with a sc at any dc

R1: ch5, *skip next stitch, sc in next, ch5* , repeat from * to *. Join at first sc. (6 ch5 spaces,6 sc)
R2: slip stitch into first Ch5 space, *ch3, 4 dc, picot, 5 dc, slip stitch into next ch space* repeat from *to* around, join and fasten off and weave ends.
And there you have it, a Pretty Little Sunflower <3
I used mine for a applique on a dish cloth holder for her stove handle.
I hope you like this pattern. Please feel free to use this pattern but do not sell or post as your own. Please post pics of your project at my facebook page Mama Bee's Crafty Things. As always, Enjoy! xoxo

Monday, September 16, 2013

Minion #2

Now I know y'all are waiting anxiously for the next hat in the minion series and after having problems with blogger ALL day yesterday ( and this morning), I am FINALLY able to post the next hat! This hat should fit your 6-12 month old snuggly.
Here it is!
**This pattern is not for sake. You may sell items from this pattern But please leave a link back here!
Materials
Small amounts of Red heart super saver yarn in
Yellow
Royal
Blue
Black
White
Grey
Needle for weaving
H hook

Size 6-12 months

R1:Ch3, 10dc in 2nd ch from hook, join on top of ch3 here and throughout pattern. (10)
R2: ch3, dc in same as join, 2dc in each around, join (20)
R3: ch3, dc in same as join,dc in next, *2 dc in next, dc in next* around, join. (30)
R4: ch3, dc in same as join, dc in next 2 dc ,*2 dc in next, dc in next 2 dc* around, join. (40)
R5: ch3, dc in same as join, dc in next 3 dc, *2dc in next, dc in next 3*around, join. (50)
R6: ch3, dc in the same as join,*2dc in next, dc in next 9*around. (55)
Switch to black

R7: ch3, dc in each around, join

Switch back to yellow

R8-10: ch3, dc in each around, join.

Switch to navy blue

R11: ch3, dc in each around, join. R12-15: ch,* Fpdc in next dc, Bpdc in next* around, join. Fasten off weave in ends.

Eye
With white, do not join
R1: Ch2, 6 sc in 1st ch from hook (6)
R2: 2sc in each around (12)
R3: *2sc in next, sc in next *around(18)
R4: *2sc in next, sc in next 2*around. (24)
R5:2sc in next, sc in next 3sc around, fasten off .

Goggle
With grey
Workin in the front loops only of eye you just made

R1: join with slip stitch, sc around, join
R2: ch1, sc around, join, fasten off, weave in ends.

Turn eye around Working in the back loops you left Join with slip stitch, sc around , fasten off and leave long tail for sewing.

With Black

R1:Ch2, 5 sc in 2nd ch from hook R2: 2sc in each , fasten off and sew onto side of eye with 2 grey rows.

Assembly

Sew eye onto middle of goggle then sew the goggle to middle of black row and embroider a smile on, tada!!

As always, I'd love to see your finished hats so please visit me on my facebook page Mama Bee's Crafty Things and post a pic on my wall or join us in the pattern sharing fun over at The Crochet Menagerie. Be sure to check back for next weeks size child size!! Till next time, ENJOY!<3

Thursday, September 12, 2013

Its a hoot!

I LOVE owls. They are so curiously majestic and a rare site to see for us here in the desert. Here is a quick and easy pattern for my little snow owl! Enjoy!
*This pattern is not for sale. Please do not sell this pattern. Please sell or gift little owls from this pattern but please link back to here.

Little Snow Owl

Materials
G hook
Caron "sheepish" in cream
Small amount of gold yarn
Two 8mm safety eyes
Stuffing
Needle

With cream ch2, 7 sc inside 2nd ch from hook.
R2 : 2 sc in each (14)
R3 : sc in next, 2 sc in next around (21)
R4 : sc in next 2,  2 sc in next (28)
R5 : working in the BL this round only, sc around (28)
R6-15: sc in each around
R16: dec, sc in next 7 around (24)
R17-19: sc in each around (24)
R20: dec, sc in next 6 sc (22)
R21: sc in each around
Place saftey eyes and stuff firmly
R22: holding opening together and working through both to close , ch5 slip stitch in next and in each across till last 2, ch 5, slip stitch in next. Fasten off, weave ends. Sew on beak.

Wings
Ch2 , 3 sc in 2nd ch from hook, ch1 turn
R2: 2 sc in each, ch1, turn
R3: 2sc, sc in next across, fasten off leaving long tail for sewing
And there you have it! You're very own snow owl. I would LOVE to see your little versions so please share your pictures on my facebook page Mama Bee's Crafty Things. Make sure you follow my blog to get emails letting you know when New patterns are released. Don't forget THIS Sunday I will be releasing the Minion hat in size 6-12 months!

Saturday, September 7, 2013

Minion hats!!!


Hello! I know it has been a while so I wanted my next patterns to be something fun. My kids love the Dispicable Me Minions and who doesn't. They are one of the most popular "things" amongst the kiddos right now so I thought what better than to share a minion hat!
I decided to make a pattern for all sizes BUT ( here's the catch lol) I will be releasing a new size weekly! You can click the follow button or enter your email to get a email letting you know when ALL my latest patterns are released <3

Materials
Small amounts of Red heart super saver yarn in
Yellow
Royal Blue
Black
White
Grey
Needle for weaving
H hook

Size 0-6 months

R1:Ch3, 10dc in 2nd ch from hook, join on top of ch3 here and throughout pattern.  (10)
R2: ch3, dc in same as join, 2dc in each around, join (20)
R3: ch3, dc in same as join,dc in next, *2 dc in next, dc in next* around, join. (30)
R4: ch3, dc in same as join, dc in next 2 dc ,*2 dc in next, dc in next 2 dc* around, join. (40)
R5: ch3, dc in same as join, dc in next 3 dc, *2dc in next, dc in next 3*around, join. (50)
Switch to black

R6: ch3, dc in each around, join

Switch back to yellow

R7-9: ch3, dc in each around, join.

Switch to navy blue

R10: ch3, dc in each around, join.
R11-14: ch,* Fpdc in next dc, Bpdc in next* around, join. Fasten off weave in ends.

Eye
With white, do not join
R1: Ch2, 6 sc in 1st ch from hook (6)
R2: 2sc in each around (12)
R3: *2sc in next, sc in next *around(18)
R4: *2sc in next, sc in next 2*around. (24)
R5:2sc in next, sc in next 3sc around, fasten off .
Goggle
With grey
Workin in the front loops only of eye you just made
R1: join with slip stitch, sc around, join
R2: ch1, sc around, join, fasten off, weave in ends. Turn eye around
Working in the back loops you left
Join with slip stitch, sc around , fasten off and leave long tail for sewing.
With Black
R1:Ch2, 5 sc in 2nd ch from hook
R2: 2sc in each , fasten off and sew onto side of eye with 2 grey rows.

Assembly

Sew eye on to middle of black row and sew smile on, tada!! I had fun designing this hat, especially since my lil one looks so cute in it LOL. As always, I'd love to see your finished hats so please visit me
on my facebook page Mama Bee's Crafty Things and post a pic on my wall or join us in the pattern sharing fun over at The Crochet Menagerie. Be sure to check back for next weeks size 6-12 month size!! Till next time, ENJOY!<3 xx

Tuesday, August 13, 2013

Rebel Princess


The Force is strong in my household lol, well according to my 6 and 3 year olds it is! I thought my baby girl could join in the Star Wars fun with her brothers so I came up with my Rebel Princess hat pattern. Needless to say we're all in love with the results and I hope you will be too! * PLEASE DO NOT SELL PATTERN. You may sell items made from this pattern but I do ask that you mention Maw Beez as the designer. <3 *

Materials

H hook
W W yarn in dark brown
Scissors
Needle
Hot glue gun (optional)

3-6 month hat

Ch2
R1: 10 dc in 2nd ch from hook join (10)
R2:  ch2 , dc in same as join, 2 dc in each around, join (20)
R3: ch2(counts as first dc.here and throughout), dc in  same as join,dc in next, *2dc in next, dc in next * around, join (30)
R4: ch2, dc in same as join, dc in next 2 dc, *2dc in next, dc in next 2 dc* around, join (40)
R5: ch2, dc in same as join, dc in next 3 dc, * 2dc in next , dc in next 3 dc* around, join. (50)
R5-11: ch2, dc in each around, join. (50)
R12: tr in next 3 stitches, dc in next 3, hdc in next 2, sc around to last 8 stitches, hdc in next 2, dc in next 3, tr in last 3 stitches join with slip stitch in original join,leaving long tail for weaving.

6-12 month hat

Repeat R1-5 of 3-6 month hat

R6: ch2, dc in same as join, dc in next 7 dc, *2 dc in next,dc in next,7*around , dc in last , join (57)
R7-12: ch2, dc in each around, join (57)
R13: tr in next 3 stitches, dc in next 3, hdc in next 2, sc around to last 8 stitches, hdc in next 2, dc in next 3, tr in last 3 stitches join with slip stitch in original join, leaving long tail for weaving.

Child size hat

Repeat rounds 1-5 of 3-6 month hat
R6: ch2, dc in same as join, dc in next 4 dc,* 2 dc in next, dc in next 4 dc * around, join (60)
R7: ch2, dc in same as join, dc in next 10 dc, *2 dc in next around, dc in next 10 dc*, join(66)
R8-13: ch2, dc in each around, join (66)
R14: tr in next 3 stitches, dc in next 3, hdc in next 2, sc around to last 8 stitches, hdc in next 2, dc in next 3, tr in last 3 stitches join with slip stitch in original join leaving long tail for weaving.

Adult Size hat

Repeat R1-6 from the child size hat
R7: ch2, dc in same as join, dc in next 5 dc, *2dc in next, dc in next 5 dc* around, join. (70)
R8-14: ch2, dc in each around, join. (70)
R15: tr in next 3 stitches, dc in next 3, hdc in next 2, sc around to last 8 stitches, hdc in next 2, dc in next 3, tr in last 3 stitches join with slip stitch leaving long tail for weaving.

BUNS

Cut 40 pieces of yarn each 45 inches long. Divide into two groups of 20. Tie one end with a square knot and braid.Tie oppisite end with square knot and trim both ends.

Starting at one end, roll into into.a tight bun, either sewing together or applying a little hot glue along the back as you go. Tuck oppisite end behind bun.
Sew or hot glue to sides of hat and you got yourself a rebel princess xx
As always please visit my page Mama Bee's Crafty Things and post pictures of your creations. Also please join us over at The Crochet Menagerie ! 
Till next time, Enjoy!!! <3

Saturday, August 3, 2013

Ready for Fall

Is Fall here yet??? Nope, three more weeks till school starts and I am so ready for summer to be over with. This heat AND humidity is killer on my skin and hair. I find myself longing for the leaves to change colors and that oh so good smell of a fireplace at work. 
On that note, I want to share with you my cute little pumpkin pattern. It is the perfect decor that you can use all throughout the Fall season. I love displaying them on my mantle and I am sure you will too <3

Materials

H hook
Redheart With Love yarn in autumn orange and dark brown
Needle for weaving
Stuffing/fill

With Orange
Ch20
R1: hdc in 3rd ch from hook and in each across,ch2,turn. (18)

*From here on out work each stitch in the top 2 stitches of previous hdc*
R2-22: hdc in same stitch and in each stitch across, ch2, turn.(18)

With WS facing you, slip stitch ends together and finish off leaving extra long tail for weaving. Flip inside out so RS is showing.

Weave tail around bottom edge as if making a drawstring bag and pull tight closing bottom.

With same tail weave top edge but before pulling tight fill with stuffing. Pull tight closing your pumkin. Using your needle sew the top close then push your needle through the middle out the bottom,pull tight and sew close bottom opening. Push your needle through the middle and out the top once more, pull tight ( this shapes your pumpkin) . Finish off/Weave in.

Stem

With drk. Brown

Ch 2
R1: 5sc in 2nd ch from hook (5)
R2: 2sc in eas around (10)
R3: sc in each around using back loops this round only (10)
R4-5: sc around (10)
R6: *sc2tog, sc in next*around (5)
R7: 2sc in each around (10)
R8: *2sc in next,sc in next* around(15)
R9: *2sc in next sc, sc in next 2*around(20)
R10: *sc in next stitch, ch3, sc in same stitch, sc in next 3 sc* around. Finish off leaving a long tail for sewing

*as always please feel free to sell finished items but I do ask that you add a link back to this page <3

If you'd like to add a cute leaf to your pumpkin I found this super cute Fall pumkin leaf pattern. I worked it up in less than 5 mins.

I would love to see the pumpkins you work up using my pattern! Please visit my facebook page Mama Bee's Crafty Things .
Also if you love crochet and free patterns please join us over at The Crochet Menagerie <3 Till next time, ENJOY! xoxo