Tuesday, August 13, 2013

Rebel Princess


The Force is strong in my household lol, well according to my 6 and 3 year olds it is! I thought my baby girl could join in the Star Wars fun with her brothers so I came up with my Rebel Princess hat pattern. Needless to say we're all in love with the results and I hope you will be too! * PLEASE DO NOT SELL PATTERN. You may sell items made from this pattern but I do ask that you mention Maw Beez as the designer. <3 *

Materials

H hook
W W yarn in dark brown
Scissors
Needle
Hot glue gun (optional)

3-6 month hat

Ch2
R1: 10 dc in 2nd ch from hook join (10)
R2:  ch2 , dc in same as join, 2 dc in each around, join (20)
R3: ch2(counts as first dc.here and throughout), dc in  same as join,dc in next, *2dc in next, dc in next * around, join (30)
R4: ch2, dc in same as join, dc in next 2 dc, *2dc in next, dc in next 2 dc* around, join (40)
R5: ch2, dc in same as join, dc in next 3 dc, * 2dc in next , dc in next 3 dc* around, join. (50)
R5-11: ch2, dc in each around, join. (50)
R12: tr in next 3 stitches, dc in next 3, hdc in next 2, sc around to last 8 stitches, hdc in next 2, dc in next 3, tr in last 3 stitches join with slip stitch in original join,leaving long tail for weaving.

6-12 month hat

Repeat R1-5 of 3-6 month hat

R6: ch2, dc in same as join, dc in next 7 dc, *2 dc in next,dc in next,7*around , dc in last , join (57)
R7-12: ch2, dc in each around, join (57)
R13: tr in next 3 stitches, dc in next 3, hdc in next 2, sc around to last 8 stitches, hdc in next 2, dc in next 3, tr in last 3 stitches join with slip stitch in original join, leaving long tail for weaving.

Child size hat

Repeat rounds 1-5 of 3-6 month hat
R6: ch2, dc in same as join, dc in next 4 dc,* 2 dc in next, dc in next 4 dc * around, join (60)
R7: ch2, dc in same as join, dc in next 10 dc, *2 dc in next around, dc in next 10 dc*, join(66)
R8-13: ch2, dc in each around, join (66)
R14: tr in next 3 stitches, dc in next 3, hdc in next 2, sc around to last 8 stitches, hdc in next 2, dc in next 3, tr in last 3 stitches join with slip stitch in original join leaving long tail for weaving.

Adult Size hat

Repeat R1-6 from the child size hat
R7: ch2, dc in same as join, dc in next 5 dc, *2dc in next, dc in next 5 dc* around, join. (70)
R8-14: ch2, dc in each around, join. (70)
R15: tr in next 3 stitches, dc in next 3, hdc in next 2, sc around to last 8 stitches, hdc in next 2, dc in next 3, tr in last 3 stitches join with slip stitch leaving long tail for weaving.
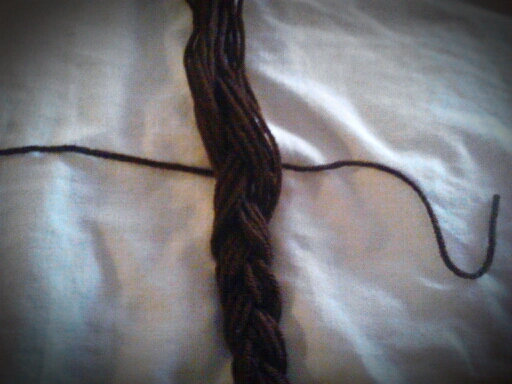
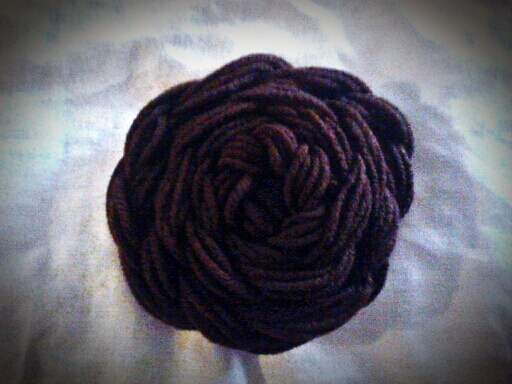
BUNS

Cut 40 pieces of yarn each 45 inches long. Divide into two groups of 20. Tie one end with a square knot and braid.Tie oppisite end with square knot and trim both ends.

Starting at one end, roll into into.a tight bun, either sewing together or applying a little hot glue along the back as you go. Tuck oppisite end behind bun.
Sew or hot glue to sides of hat and you got yourself a rebel princess xx
As always please visit my page Mama Bee's Crafty Things and post pictures of your creations. Also please join us over at The Crochet Menagerie ! 
Till next time, Enjoy!!! <3

Saturday, August 3, 2013

Ready for Fall

Is Fall here yet??? Nope, three more weeks till school starts and I am so ready for summer to be over with. This heat AND humidity is killer on my skin and hair. I find myself longing for the leaves to change colors and that oh so good smell of a fireplace at work. 
On that note, I want to share with you my cute little pumpkin pattern. It is the perfect decor that you can use all throughout the Fall season. I love displaying them on my mantle and I am sure you will too <3

Materials

H hook
Redheart With Love yarn in autumn orange and dark brown
Needle for weaving
Stuffing/fill

With Orange
Ch20
R1: hdc in 3rd ch from hook and in each across,ch2,turn. (18)

*From here on out work each stitch in the top 2 stitches of previous hdc*
R2-22: hdc in same stitch and in each stitch across, ch2, turn.(18)

With WS facing you, slip stitch ends together and finish off leaving extra long tail for weaving. Flip inside out so RS is showing.

Weave tail around bottom edge as if making a drawstring bag and pull tight closing bottom.

With same tail weave top edge but before pulling tight fill with stuffing. Pull tight closing your pumkin. Using your needle sew the top close then push your needle through the middle out the bottom,pull tight and sew close bottom opening. Push your needle through the middle and out the top once more, pull tight ( this shapes your pumpkin) . Finish off/Weave in.

Stem

With drk. Brown

Ch 2
R1: 5sc in 2nd ch from hook (5)
R2: 2sc in eas around (10)
R3: sc in each around using back loops this round only (10)
R4-5: sc around (10)
R6: *sc2tog, sc in next*around (5)
R7: 2sc in each around (10)
R8: *2sc in next,sc in next* around(15)
R9: *2sc in next sc, sc in next 2*around(20)
R10: *sc in next stitch, ch3, sc in same stitch, sc in next 3 sc* around. Finish off leaving a long tail for sewing

*as always please feel free to sell finished items but I do ask that you add a link back to this page <3

If you'd like to add a cute leaf to your pumpkin I found this super cute Fall pumkin leaf pattern. I worked it up in less than 5 mins.

I would love to see the pumpkins you work up using my pattern! Please visit my facebook page Mama Bee's Crafty Things .
Also if you love crochet and free patterns please join us over at The Crochet Menagerie <3 Till next time, ENJOY! xoxo